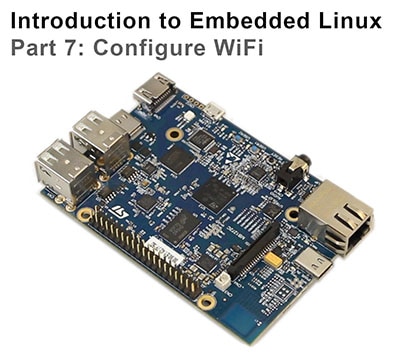
制造商零件编号 STM32MP157D-DK1
DISCOVERY STM32MP157D EVAL BRD
STMicroelectronics
License: Attribution Single Board Computers
In the previous tutorial, we showed you how to create a custom layer and a custom image in the Yocto Project, build the image, and flash it to an SD card. This time, we will use that custom layer to create a device tree patch that enables an I2C port on the STM32MP157D-DK1.
See here if you would like to view this tutorial in video format:
Required Hardware
I will try to explain what is happening at each step in these tutorials so that you can generalize the instructions to almost any single board computer (assuming the board is supported by the build system). However, for the demonstration, I will be using the following platform:
You will also need an SD card. The STM32MP157D-DK1 kit should come with an SD card. In addition, you will need a USB-C power supply capable of supplying 5V, 3A.
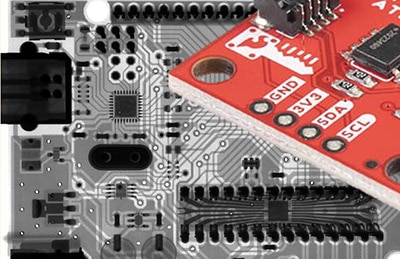
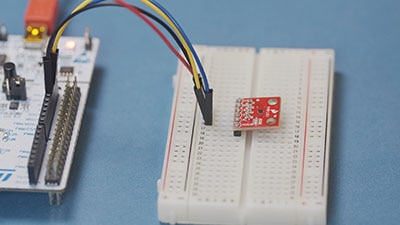
For this I2C demo, you will also need a TMP102 temperature sensor breakout board.
Required Software
You will need Linux for this project, as all of the tools we are using must be run in Linux (on the host computer). I will show steps that work in Ubuntu and Linux Mint (and likely other flavors of Debian), but you can probably get almost any Linux distro to work. LiveCD, dual-booting, Windows Subsystem for Linux (WSL), and pre-made Docker images will also likely work.
I also recommend using a fairly modern computer with at least 4GB of RAM. While you can probably build a Linux image in a Rasbperry Pi, expect it to take a very long time.
Find I2C Port
If you look at the datasheet for the STM32MP157D-DK1 development board, you can see that there are 6 I2C busses available. By default I2C ports 1 and 4 are enabled and used to control other components on the board. We want to enable port 5 (as it is broken out to the Raspberry Pi-style header on the board) and use it to communicate with a temperature sensor. SDA is on top header (CN2) pin 3 and SCL is on pin 5.
If you look at the STM32MP157 reference manual, you can see that I2C port 5 is controlled by registers starting at memory address 0x40015000.
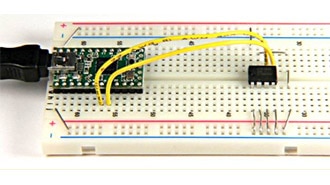
Hardware Connections
Connect the TMP102 breakout board to the STM32MP157D-DK1 as follows:
Create Device Tree Patch
On your host computer, navigate to the build directory and copy the device tree source (.dts) file to a temporary working directory. Then, create a copy of the original. Open it to make changes. Feel free to look through this guide to learn more about device trees.
cd ~/Projects/yocto/build-mp1/
cp tmp/work-shared/stm32mp1/kernel-source/arch/arm/boot/dts/stm32mp157d-dk1.dts ~/Documents
cd ~/Documents
cp stm32mp157d-dk1.dts ctm32mp157d-dk1.dts.orig
vi stm32mp157d-dk1.dts
At the bottom of the file, add the following device tree node:
&i2c5 {
	pinctrl-names = "default", "sleep";
	pinctrl-0 = <&i2c5_pins_a>;
	pinctrl-1 = <&i2c5_sleep_pins_a>;
	i2c-scl-rising-time-ns = <185>;
	i2c-scl-falling-time-ns = <20>;
	clock-frequency = <100000>;
	status = "okay";
};
Your device tree source file should look like the following:
Save and exit. Then, create a diff patch. Note the “--no-index” argument allows us to perform git diff on two different files that are not part of a git repository.
git diff --no-index stm32mp157d-dk1.dts.orig stm32mp157d-dk1.dts > 0001-add-i2c5-userspace-dts.patch
However, because bitbake expects such diff files to be part of a repository, we need to make a couple of manual changes to the file so that it will be applied to the correct file (in a particular directory structure in the working area of build-mp1/tmp/). Open the file with:
vi 0001-add-i2c5-userspace-dts.patch
Change the file header so that it points to the correct file locations:
--- a/arch/arm/boot/dts/stm32mp157d-dk1.dts
+++ b/arch/arm/boot/dts/stm32mp157d-dk1.dts
The patch file should look like the following:
Create Custom Recipe to Apply Patch to Device Tree
Enable our build environment and navigate to the custom layer we created in the third tutorial:
cd ~/Projects/yocto/
source poky/oe-init-build-env build-mp1/
cd ../meta-custom/
Create a directory structure for kernel recipes. The naming is important! The patch file must be in “linux/<machine-name>.”
mkdir -p recipes-kernel/linux/stm32mp1/
Copy in our patch file:
cp ~/Documents/0001-add-i2c5-userspace-dts.patch recipes-kernel/linux/stm32mp1/
You can run the following to discover the name of the kernel we are working with:
oe-pkgdata-util lookup-recipe kernel
In the linux/ directory, create a custom .bbappend file (which will be added to our main kernel recipe). Once again, the name is important! It must be “<kernel-name>_version.bbappend. We can use ‘%’ as the version number to be a wildcard that matches any version of that file.
vi recipes-kernel/linux/linux-stm32mp_%.bbappend
In this file, add the following lines, which tell the kernel recipe to look in “this directory” (the directory containing this .bbappend file) and apply the patch to the kernel.
FILESEXTRAPATHS_prepend := "${THISDIR}:"
SRC_URI += "file://0001-add-i2c5-userspace-dts.patch"
Save and exit.
Enable i2cdetect and Build
To test our temperature sensor, we want to probe it on the I2C bus. The easiest way to do that is with the i2cdetect tool, which comes with busybox. However, it is not enabled by default for our image, so we need to enable it.
Navigate to the build folder and bring up the busybox menuconfig screen:
cd ../build-mp1
bitbake -c menuconfig busybox
In there, head to Miscellaneous Utilities, highlight i2cdetect, and press the spacebar to enable that tool. It should have an asterisk [*] in the select box to denote that the tool will be included with busybox in the next build.
Select Exit with the arrow keys and press ‘enter’ to leave that screen. Do that again to exit menuconfig. Save the configuration when asked.
Build the custom image:
bitbake custom-image
When the build process is finished, flash the bootfs and rootfs onto the SD card as shown at the end of Part 4 (we need to flash bootfs as we made changes to the kernel).
Don’t forget to change bootfs/mmc0_extlinux/extlinux.conf so that root points to /dev/mmcblk05!
Test I2C
Plug the SD card into your STM32MP157D-DK1 and boot it up. Connect to the serial terminal with the following (you may need to change ttyACM0 to some other device file, depending on how your host Linux configured the serial connection):
picocom -b 115200 /dev/ttyACM0
Log in to the board with “root” and “toor” as the password. Run the following command:
ls -l /sys/bus/i2c/devices
This should show you which device files (in /dev/) are symbolically linked to i2c ports/drivers on the main processor. In my case, /dev/i2c-1 is linked to I2C 5 (address 0x40015000), which is the port we just enabled.
Assuming you have made good hardware connections to the TMP102, you should be able to run the following command. Note that the bus number (1) should match the device file number (e.g. use “-y n” for /dev/i2c-n).
i2cdetect -y 1
If all goes well, you should see 0x48 being reported on the bus, which means you can communicate with the TMP102!
Recommended Reading
The following material should help you as you continue your embedded Linux journey:
Intro to Embedded Linux Part 4 - Create Custom Layer and Image in Yocto
Intro to Embedded Linux Part 6 - Add Custom Application to Yocto Build
Intro to Embedded Linux Part 7 - Enable WiFi Networking with Yocto
I found the following guides helpful when creating this tutorial:
ST has a great workshop series on the STM32MP1 where you can learn more about the hardware, drivers, Linux, etc.
The Yocto Project YouTube channel has a number of videos like this one to help you get started.
Robert Nelson at Digi-Key maintains a great series of getting started guides with Yocto for various boards that you can view here.