制造商零件编号 SC1112
SBC 2.4GHZ 4 CORE 8GB RAM
Raspberry Pi
Single Board Computers Wireless Raspberry Pi SBC
Do you ever get tired of the incessant ads on the internet, making your internet browsing experience worse? Or what about the pesky trackers that log data about you as you browse websites? We'll talk about how you can create ad-block (and more!) for your home internet using the Pi-Hole, a DNS sinkhole.
As mentioned before, the Pi-Hole is a DNS sinkhole. In order to understand what that means, and how that can help us block ads, we must first understand the DNS protocol and a little bit about how the internet works.
DNS (Domain Name System) is like a phone book for the internet. It translates easily readable domain names (www.Digikey.com) into IP addresses (23.37.18.160), which computers use to locate other servers and computers.
Let's take the example of a phone book. If you wanted to call John Smith, you would look for his name in the phone book and find the associated phone number. Now that you know the phone number, you can establish a connection with John Smith by calling him! In the same way, when you enter a domain name into your browser, your router sends a request to a special server called the DNS server. The DNS server acts like a phone book and gives your router the IP address of the domain you've entered. With the IP address, you can establish a connection to the website!
A common misconception with websites is that they come preloaded with ads. Most modern-day websites have designated spots on their websites for ads but make additional requests to ad servers for the ad content itself. When you type in the domain name of a webpage with ads, your computer will initially request the DNS server for the IP address of the website itself. As the website loads, it creates more DNS requests through your computer to populate the website with ads from an ad domain.
It's this second stage that can make the internet a miserable experience sometimes. Webpages full of ads can take forever to load due to the sheer number of DNS requests being placed and all the dynamic content on the screen!
A DNS sinkhole like the Pi-Hole works as the middleman between your devices and the DNS server, only blocking the ad domains. It does this by comparing the domain request to a blacklist of common ad domains (or data trackers). If a domain matches one on the blacklist, the Pi-Hole simply returns the IP address 0.0.0.0, which is commonly used as the "not found" or "error" address.
This has no effect on most websites other than to remove the ads! Instead of an ad, you will simply see an empty spot where an ad used to be. If the domain isn't blacklisted, the Pi-Hole will ask the DNS server for the IP address, and report it to the computer, and the process will proceed as if nothing has happened.
To install the Pi-Hole, you need two things: A network-connected Raspberry Pi Device and an SD card (at least 16GB recommended) for the Pi's storage. Don't stress too much about which Pi you use, I used a Zero W in this example, and for a few devices it held up great!
First, download the Raspberry Pi Installer. This is how we will flash the Raspbian OS onto the SD card. The imager is pretty self-explanatory, but I'll include images to walk you through the process. On the main screen, set up the fields as follows (change the device if you're not using a Pi Zero):
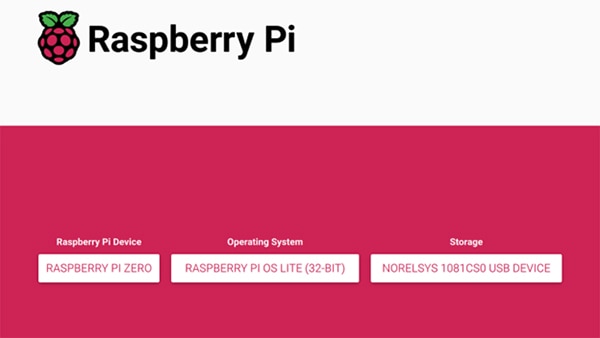
After pressing next, you'll be prompted with the following pop-up. Be sure to choose "edit settings"!

Configure the wireless LAN and be sure to enter the SSID and password for the network you'll be using the adblocker on!
Navigate to the services tab and enable SSH.
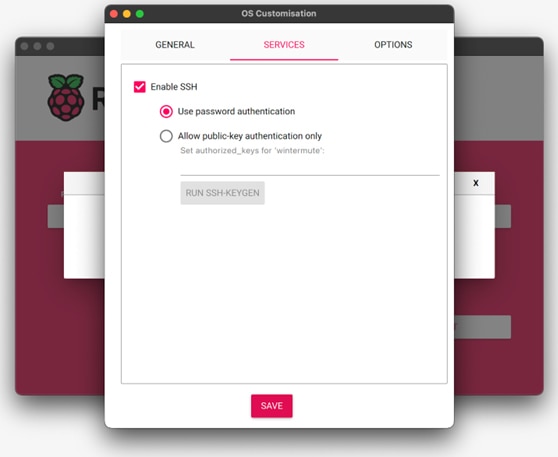
Hit save to apply the customizations and then hit yes to start flashing the SD card. When the SD card is done being flashed, plug it into your Pi and power your Pi on.
Before we can interface with the Pi, we need to figure out its IP address so we can SSH in and set up our Pi-Hole. SSH is a method of accessing a computer through a wireless connection.
Using your laptop, open Windows PowerShell. and enter the following command:
ping raspberrypi -4
If you've changed the name of the Pi in the OS customization step, you may also have to try that name. If you receive the following reply, you've successfully found the Pi on your network!
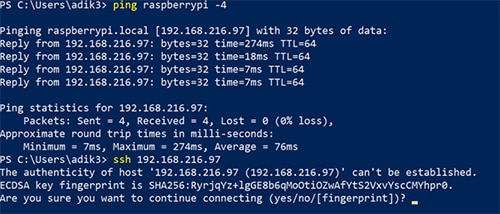
Like the image above shows, after pinging the Pi, be sure to note its IP address. Then type in the command
ssh "YOUR PI IP ADDRESS HERE"
You will be prompted if you really want to continue connecting. Type yes. You will then be prompted for the password, which you provided during the setup process. After entering this password, you will be connected to your Raspberry Pi!

After accessing your Pi-Hole, you'll want to enable a static IP. A static IP prevents the IP address for your Pi from changing even if it or the router power cycles. Every router has a different method, so you'll have to find how to do it for your model. Typically, this setting is found in the admin panel of your router.
After enabling a static IP, you can use the following command while connected to your Pi to install the Pi-Hole software:
curl -sSL https://install.pi-hole.net | bash
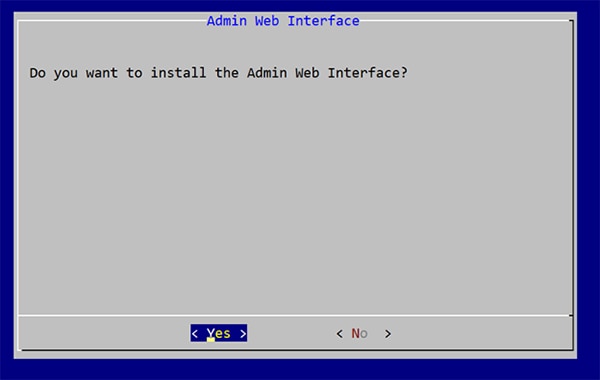
If using a curl command gives you the heebie jeebies, you can browse through Pi-Hole's installation guide for different methods. The software is entirely open source! Once the command finishes running, you'll be greeted with the following screen:

The installation is pretty self-explanatory and is well explained. I would highly recommend that you install the admin web interface, as it will make your life MUCH easier later on.
After the packages are installed, you will be presented with your login information and your password. On your browser, navigate to the admin panel website provided. If you cannot find it, navigate to the admin website: http://(YOUR PI-HOLE IP ADDRESS)//admin/index.php.
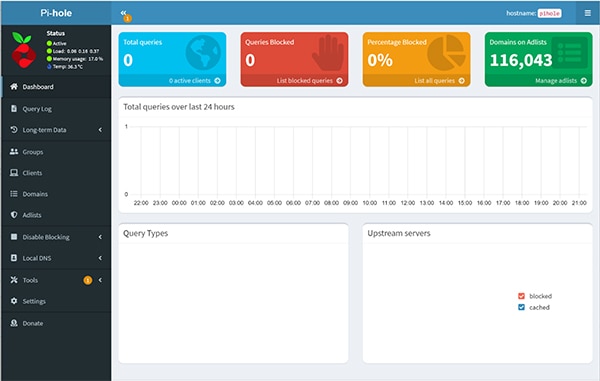
Where you can login to your Pi-Hole. Upon login, you should see the admin panel. This panel is where you can manage the settings of your Pi-Hole, including monitoring DNS requests, updating your blacklists, and whitelisting a website that's mistakenly been blocked. You can see that just with the default blacklist provided in the installation, the Pi-Hole will block over 116,000 tracking and ad-serving domains!
We aren't done just yet though. All of the devices on our network are still sending their requests to the default DNS server (like Google or Cloudflare). We need to point them to the Pi-Hole. Many modern routers have the option to set their DNS server to an alternate one. You'll have to search around for instructions on your specific router, but on my router, I can set the DNS server in the WAN settings. Simply set that field to the IP address of your Pi and you're done!
An important thing to note is that you must not add a secondary DNS server. If you do this, requests that the Pi-Hole blocks will go through the second DNS server instead, which defeats the purpose.

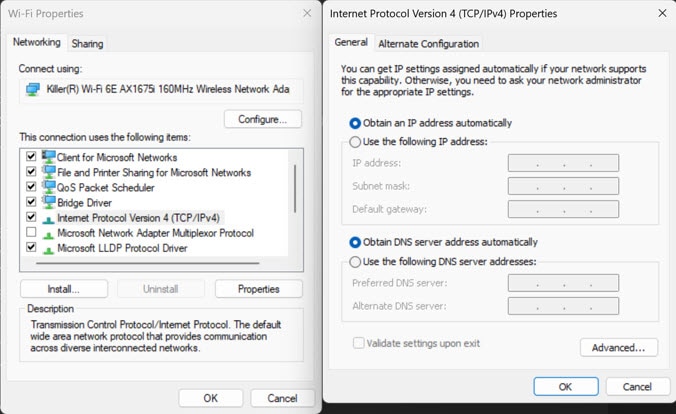
For those of you who cannot change this setting in your router, you can alternatively manually change the DNS server on each one of your devices. For a Windows computer, you can find the DNS server setting in the Wi-Fi adapter options. You can change the properties in the IPV4 tab to use a specified DNS server address. Again, do not provide it with a secondary address!
And voila! After all that you should have a fully functioning ad block for your network and a smoother internet experience! For further instructions on how to use the admin panel and maintenance on your Pi-Hole, I highly recommend checking out the Pi-Hole documentation, which is very extensive.