How to Flash the Arduino Bootloader to an ATTiny85 IC
2022-01-03 | By Maker.io Staff
The Arduino range of development boards is hugely popular. If you’ve ever worked with one of their microcontroller boards, it’s easy to see why they are so ubiquitous. Arduino-compatible boards are equally sought-after due to their lower price tag and how accessible they are.
The Arduino bootloader and the straightforward Arduino IDE play an immense role in the overall simplicity of Arduino boards. Some projects, however, require the use of a small microcontroller, and they don’t need the extras that a full-sized Arduino board offers. If your project falls in that category, you can get the best of both worlds: A tiny MCU that runs the Arduino bootloader and the simplicity of the Arduino platform. This article walks you through the process of flashing the Arduino bootloader on an ATTiny85 microcontroller.
Turn the Arduino UNO into an ISP
Unfortunately, you can’t just plug the ATTiny85 MCU into a computer to program it. For that, you first need a so-called in-system programmer (ISP) that receives instructions from a computer (for example, via USB) and then transmits those instructions to the ATTiny85. I employed a standard Arduino UNO development board for that purpose.
But before you connect the ATTiny to the Arduino, make sure to upload the following example sketch to the Arduino UNO board. This sketch comes with the latest versions of the Arduino IDE:
 Upload this example sketch to the Arduino board to turn it into an ISP for ATTiny MCUs.
Setting up the Required Hardware
Once you’ve uploaded the ArduinoISP sketch to your Arduino UNO, you can go ahead and connect the ATTiny to the Arduino as shown in the following schematic diagram:
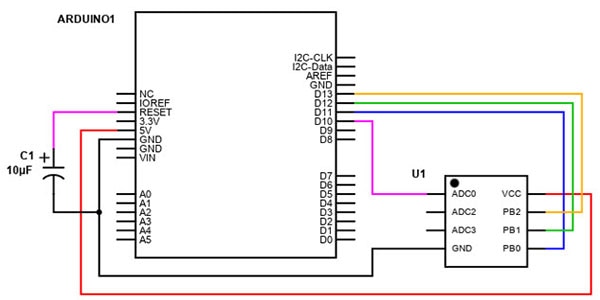 Connect the ATTiny MCU to your Arduino UNO, as shown in the schematic above.
Note that you have to tie the reset pin of the Arduino UNO to GND via a capacitor to prevent the development board from resetting when you upload a sketch to the ATTiny. Under normal circumstances, the Arduino IDE would reset the Arduino UNO board before uploading a sketch. However, in this case, we don’t want that to happen. Instead, the Arduino itself should reset the ATTiny MCU and then forward the data coming from the PC to the ATTiny.
Configure the Arduino IDE Before Uploading a Sketch
You have to enable support for the ATTiny line of MCUs in the Arduino IDE before you can utilize it to upload data to the ATTiny. For that, navigate to the IDE’s preferences window and then click the following button to add additional board manager URLs:
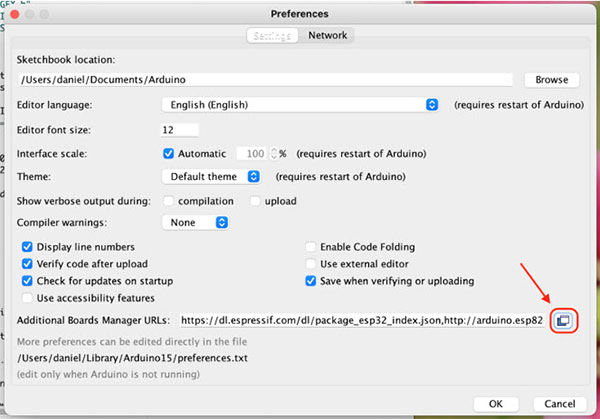 Use the highlighted button in the Arduino IDE preferences window to bring up the ‘Additional Board Manager URLs’ pop-up dialogue.
In the dialogue window that opens, add the following board manager URL:
Add the URL to a new line if the additional board manager URL list already contains entries. Otherwise, paste the link into the empty text input field. My IDE already has a few additional links, so the pop-up window looks like this in my case:
 I added the new URL to the end of the board manager URLs list.
Next, head over to the Arduino IDE’s boards manager window and search for 'ATTiny'. You can open the Boards Manager from the IDE’s main menu bar. For that, click on 'Tools', then choose 'Board' and select 'Boards Manager...'. Doing so opens the following window:
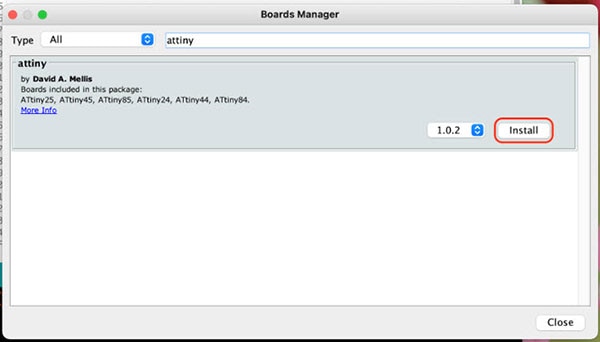 Use the highlighted button to install the ATTiny board support files in the Arduino IDE.
Burn the Arduino Bootloader and Upload an Arduino Sketch to the ATTiny85
Once you’ve successfully installed the ATTiny board support files as demonstrated above, head back over to the ‘Boards’ section of the Arduino IDE’s main menu bar. You can now select various ATTiny MCUs from this list. I’ll use the ATTiny85 throughout this example:
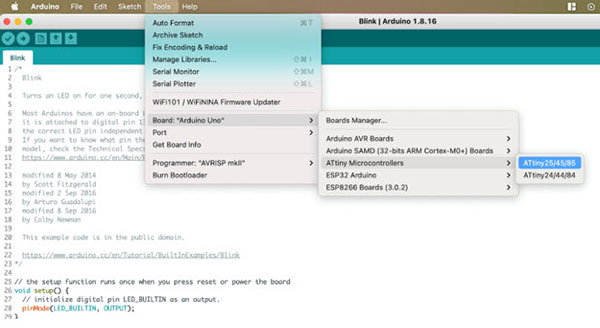 Select ATTiny85 from the "Boards" section of the Arduino IDE’s main menu bar.
Next, make sure to check the settings and correct them if necessary. In this case, I chose ATTiny85 and the 8MHz internal clock. While you’re at it, make sure to also select the ‘Arduino as ISP’ option:
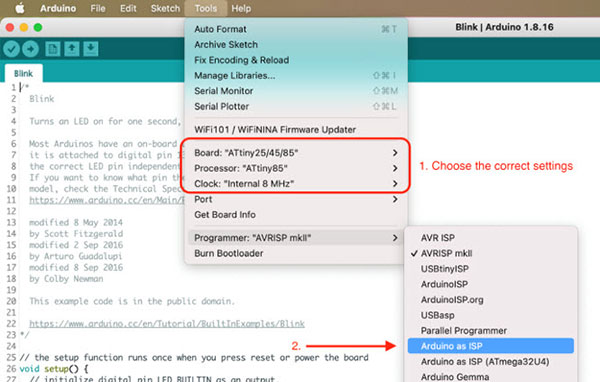 Select the correct options from the Arduino IDE’s main menu. Also, make sure to change the programmer.
Then, you can burn the Arduino bootloader. For that, select the ‘Burn Bootloader’ option from the Tools menu in the Arduino IDE:
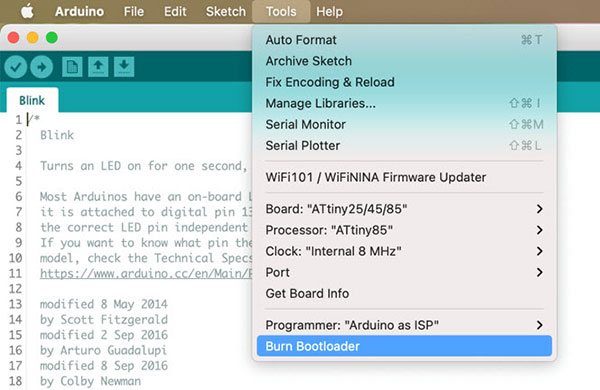 You can now use the Arduino IDE to burn the bootloader on the ATTiny85. The IDE will let you know once the process is complete.
Once you’ve successfully uploaded the Arduino bootloader to the ATTiny85, you can then proceed to program it using the Arduino IDE. You can write the code using the IDE and upload it the same way you’ve uploaded the bootloader. Note that some Arduino libraries might not work correctly on the ATTiny without modifications.
Summary
The ATTiny range of microcontrollers is a versatile tool for makers. They are perfect for DIY projects that don’t utilize many GPIO pins and for projects where the overall size of the final product matters. You can upload Arduino sketches to an ATTiny using the Arduino IDE. However, you’ll need an Arduino that acts as an ISP for uploading programs to the ATTiny using the Arduino IDE.
Start by uploading the ISP example sketch to your Arduino board. Then, connect the ATTiny to the Arduino. In the IDE, add the ATTiny board support files. Then, select the correct ATTiny model and CPU clock frequency. Lastly, burn the bootloader before uploading your sketch.


