制造商零件编号 18377
QWIIC FS3000 AIR VELOCITY SENSOR
SparkFun Electronics
Courtesy of SparkFun
Guide by QCPete, Ell C
Introduction
Need to keep track of the airflow in your data center or around your servers? How about making sure your HVAC and air control systems are functioning at full capacity? Or, if you're more fun, what about figuring out how fast your RC airplane is going? Well, the SparkFun Air Velocity Sensor Breakout - FS3000-1005 and FS3000-1015 can help you with all that and more! It's super easy, super Qwiic to hookup, and super fun to play with. Let's have a look!
SparkFun Air Velocity Sensor Breakout - FS3000-1005 (Qwiic)
SparkFun Air Velocity Sensor Breakout - FS3000-1015 (Qwiic)
Required Materials
To follow along with this tutorial, you will need the following materials. You may not need everything though depending on what you have. Add it to your cart, read through the guide, and adjust the cart as necessary.
Air Velocity Sensor Breakout - FS3000-1005 Wish List
Air Velocity Sensor Breakout - FS3000-1015 Wish List
Note: If you decide to use the Artemis RedBoard Nano, make sure to install the Arduino Board Add-On in Arduino and select the appropriate board when uploading code!
Suggested Reading
If you aren't familiar with the Qwiic system, take a look here for an overview.
We also recommend taking a look at the following tutorials if you aren't familiar with the concepts covered in them.
What is an Arduino? What is this 'Arduino' thing anyway? These tutorials dive into what an Arduino is and along with Arduino projects and widgets.
Installing Arduino IDE: A step-by-step guide to installing and testing the Arduino software on Windows, Mac, and Linux.
Logic Levels: Learn the difference between 3.3V and 5V devices and logic levels.
I2C: An introduction to I2C, one of the main embedded communications protocols in use today.
Hardware Overview
FS3000
The FS3000 is a surface-mount type air velocity module utilizing a MEMS thermopile-based sensor. It features a digital output with 12-bit resolution and comprises a “solid” thermal isolation technology and silicon carbide coating to protect it from abrasive wear and water condensation.
There are two versions of this sensor with different upper ranges (1005/1015). The 1005 version which can sense 0 to 7.23m/s (0 to 16.17mph) and 1015 version which can sense 0 to 15m/s (0 to 33.6mph). By looking at the PCB, there will be a solder blob indicating which version that you ordered and received. You can also check out the markings labeled on the IC. You'll also notice the arrow on the matching the silkscreen indicating what direction air should flow for a measurement. For the scope of this tutorial, we will be using the FS3000-1005 mostly to highlight the board and connect.
FS3000-1005 [ SEN-18377 ]
FS3000-1015 [ SEN-18768 ]
Below is a table of a few of the specifications taken from the datasheet. For more in-depth information on this chip, please refer to the datasheet linked in the Resources and Going Further.
Qwiic Connectors
Our Qwiic Ecosystem makes sensors pretty much plug and play. There are two Qwiic connectors on either side of the Qwiic Air Velocity Sensor board to provide power and I2C connectivity simultaneously. The sensor's I2C lines are connected to two 2.2kΩ pull-up resistors. The I2C address of the board is 0x28.
Pins
Power
Ideally, power will be supplied via the Qwiic connectors on either side of the board. Alternatively, power can be supplied through the header along the bottom side of the board labeled 3V3 and GND. The input voltage range should be between 2.7-3.3V. The usual current draw is around 10mA.
I2C
The I2C pins break out the functionality of the Qwiic connectors. Depending on your application, you can connect to these pins via the plated through holes for SDA and SCL.
VCM and ADCR
VCM is an output from the sensor that provides a common bias voltage. With a power supply voltage at 3.3V (usual for Qwiic), the VCM pin will output 1.25V. The current datasheet does not provide any more information about this pin; however, it is most likely a bias voltage used with some sort of analog gain stage internal to the sensor (prior to its internal ADC). This can be useful for unique more advanced projects that may benefit from having a known bias voltage tied to another analog system.
ADCR stands for ADC Reference. This is an input to the FS3000 which allows you to provide a reference voltage for the sensor's internal ADC. Note, you must first cut the "ADC-REF" jumper (on the bottom side of the board) before providing a custom voltage to this pin. By default, it is connected to VDD.
Jumpers
LED
If power consumption is an issue, cutting this jumper will disable the Power LED on the front of the board.
PWR LED
on Top Side
LED Jumper
on Bottom Side
ADC-REF
Cut the ADC-REF jumper to provide your own custom ADC reference voltage on the ADCR header pin. By default (jumper closed), it is connected to VDD.
I2C
The SparkFun Air Velocity Sensor has pull up resistors attached to the I2C bus; if multiple sensors are connected to the bus with the pull-up resistors enabled, the parallel equivalent resistance will create too strong of a pull-up for the bus to operate correctly. As a general rule of thumb, disable all but one pair of pull-up resistors if multiple devices are connected to the bus. If you need to disconnect the pull up resistors, they can be removed by cutting the traces on the corresponding jumpers highlighted below.
Board Outline
Hardware Hookup
Using the Qwiic system, assembling the hardware is simple. All you need to do is connect your Air Velocity Sensor Breakout to your chosen development board with a Qwiic cable or adapter cable. Otherwise, you can use the I2C pins broken out if you do not have a Qwiic connector on your development board or if you do not want to use a Qwiic connection. If you are not using a Qwiic-enabled board, make sure your input voltage and logic are either running at 3.3V or you are shifting the logic level from whatever logic your controller runs at to 3.3V.
Software Setup and Programming
Note: Make sure you are using the latest stable version of the Arduino IDE on your desktop.
If this is your first time using Arduino, please review our tutorial on installing the Arduino IDE. If you have not previously installed an Arduino library, please check out our installation guide.
SparkFun has written a library to work with the Qwiic Air Velocity Sensor. You can obtain this library through the Arduino Library Manager by searching for "SparkFun FS3000". Find the one written by SparkFun Electronics and install the latest version. If you prefer downloading libraries manually, you can grab them from the GitHub Repository or by clicking on the button below.
SparkFun Air Velocity Sensor Breakout - FS3000 (Qwiic) Arduino Library GitHub
Readings
The FS3000 has a response time of 125ms. In the provided example, we are only taking readings from the sensor once per second, so this is well above the response time. If you wish to take a higher frequency of readings, make sure to add in at least a 125ms delay in between each read.
To calculate or understand airflow and how it relates to diameter, you can use this tool.
Functions
Below is a list of the functions that can be used with the Air Velocity Sensor, along with a description of what each function does and how to use it.
FS3000() - Base constructor
begin() -- Initialize the sensor. Returns false if sensor is not detected.
isConnected() -- Returns true if I2C device ack's
fs.setRange() -- Sets the range for the IC that is connected to the Arduino microcontroller. You can input AIRFLOW_RANGE_7_MPS for the FS3000-1005 or AIRFLOW_RANGE_15_MPS for the FS3000-1015.
readRaw() -- Read from sensor, checksum, return raw data (409-3686)
readMetersPerSecond() -- Read from sensor, checksum, return m/s (0-7.23)
readMilesPerHour() -- Read from sensor, checksum, return mph (0-33ish)
Note: If you are using a board with an Apollo core, please note that 100KHz on the Apollo 2.1.1 doesn't currently work. You will need to use 400KHz or jump back to Apollo 2.1.0.
Example Code
Once you've installed the FS3000 library, you should see File > Examples > SparkFun_FS3000_Arduino_Library > Example01_BasicReadings to open the example sketch.
Alternatively, you can copy and paste the code below into a fresh Arduino sketch.
/******************************************************************************
  Example_01_BasicReadings.ino

  Read values of air velocity from the FS3000 sensor, print them to terminal.
  Prints raw data, m/s and mph.
  Note, the response time on the sensor is 125ms.

  SparkFun FS3000 Arduino Library
  Pete Lewis @ SparkFun Electronics
  Original Creation Date: August 5th, 2021
  https://github.com/sparkfun/SparkFun_FS3000_Arduino_Library

  Development environment specifics:

  IDE: Arduino 1.8.15
  Hardware Platform: SparkFun RedBoard Qwiic
  SparkFun Air Velocity Sensor Breakout - FS3000 (Qwiic) Version: 1.0

  Artemis RedBoard @ 400KHz (Core v2.1.0)
  (note, v2.1.1 has a known issue with clock stretching at 100KHz)

  Do you like this library? Help support SparkFun. Buy a board!

    SparkFun Air Velocity Sensor Breakout - FS3000-1005 (Qwiic)
    https://www.sparkfun.com/products/18377

    SparkFun Air Velocity Sensor Breakout - FS3000-1015 (Qwiic)
    https://www.sparkfun.com/products/18768

  Hardware Connections:
  Use a Qwiic cable to connect from the RedBoard Qwiic to the FS3000 breakout (QWIIC).
  You can also choose to wire up the connections using the header pins like so:

  ARDUINO --> FS3000
  SDA (A4) --> SDA
  SCL (A5) --> SCL
  3.3V --> 3.3V
  GND --> GND

  This program is distributed in the hope that it will be useful,
  but WITHOUT ANY WARRANTY; without even the implied warranty of
  MERCHANTABILITY or FITNESS FOR A PARTICULAR PURPOSE. See the
  GNU General Public License for more details.

  You should have received a copy of the GNU General Public License
  along with this program.  If not, see <http://www.gnu.org/licenses/>.
******************************************************************************/

#include <Wire.h>
#include <SparkFun_FS3000_Arduino_Library.h> //Click here to get the library: http://librarymanager/All#SparkFun_FS3000

FS3000 fs;

void setup()
{
  Serial.begin(115200);
  Serial.println("Example 1 - Reading values from the FS3000");

  Wire.begin();

  if (fs.begin() == false) //Begin communication over I2C
  {
    Serial.println("The sensor did not respond. Please check wiring.");
    while(1); //Freeze
  }

  // Set the range to match which version of the sensor you are using.
  // FS3000-1005 (0-7.23 m/sec) --->>>  AIRFLOW_RANGE_7_MPS
  // FS3000-1015 (0-15 m/sec)   --->>>  AIRFLOW_RANGE_15_MPS
  fs.setRange(AIRFLOW_RANGE_7_MPS);
  //fs.setRange(AIRFLOW_RANGE_15_MPS);

  Serial.println("Sensor is connected properly.");
}

void loop()
{
    Serial.print("FS3000 Readings \tRaw: ");
    Serial.print(fs.readRaw()); // note, this returns an int from 0-3686

    Serial.print("\tm/s: ");
    Serial.print(fs.readMetersPerSecond()); // note, this returns a float from 0-7.23 for the FS3000-1005, and 0-15 for the FS3000-1015

    Serial.print("\tmph: ");
    Serial.println(fs.readMilesPerHour()); // note, this returns a float from 0-16.17 for the FS3000-1005, and 0-33.55 for the FS3000-1015


    delay(1000); // note, reponse time on the sensor is 125ms
}
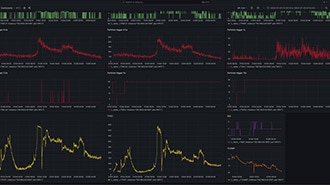
Set your Board and Serial Port and then upload the sketch to your Arduino. Then open the serial monitor. Make sure your baud rate is set to 115200. You'll begin to see output, including raw data and translated miles per second and miles per hour.
Note that peak in the middle of the readings? That's where I pointed the sensor at the fan!
Troubleshooting
Need help?
If your product is not working as you expected or you need technical assistance or information, head on over to the SparkFun Technical Assistance page for some initial troubleshooting.
If you don't find what you need there, the SparkFun Forums are a great place to find and ask for help. If this is your first visit, you'll need to create a Forum Account to search product forums and post questions.
Resources and Going Further
For more on the Air Velocity Sensor Breakout, check out some of the links below:
Datasheet (PDF) (FS3000-1005 & FS3000-1015)