制造商零件编号 13883
DEV LILYPAD COIN CELL BATT HOLDR
SparkFun Electronics
License: See Original Project Hand Tools Multimeter Test Equipment
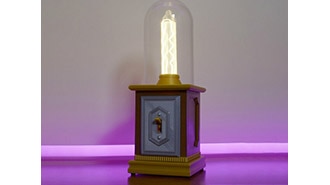
Today, I’m sharing a super fun project that I collaborated on with a bartender friend of mine. He asked me to make a set of illuminated mushroom drink menus inspired by Alice in Wonderland. The idea is that he presents a mushroom, and when the recipient lifts the cap, text is revealed, letting them know which drink they are about to get. I modified Wuguigui’s free mushroom desk lamp files and added a battery-powered LED circuit to create this easy glowing 3D printing project.
Supplies:
Soldering tools and supplies:
E6000 adhesive
Printer and paper
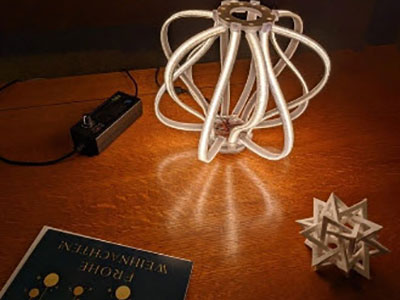
The mushroom lamp design on Printables had to be modified because it uses an incandescent light fixture, but it’s such a lovely design that I chose to build on top of it rather than recreate something similar. The white dots are printed separately from the top dome, and the two main pieces screw together with their integrated threads.
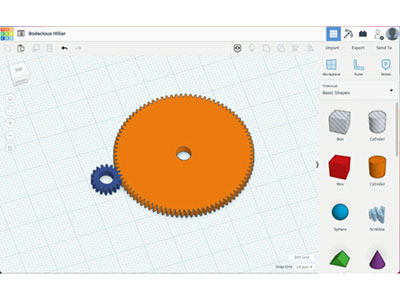
I pulled the files into Tinkercad to make my changes. I’m not an expert 3D modeler, but you’d be surprised how far you can get just by chopping and screwing free models you find online. This design permits remixing under its Creative Commons Attribution-Noncommercial-Share Alike license, provided I don’t sell the resulting lamps and that I publish my files under the same license.
The original base included the stem and gills of the mushroom, but I separated them by duplicating the shape and chopping different sections of it off by grouping it with a negative space shape in Tinkercad. I also added some cylinders to fill in the bottom of the base and the center of the gills, where the text will go. I added a small shelf to the top of the mushroom for the battery holder to rest against, and a small hole where the switch can be accessed using a toothpick.
I 3D printed this piece in red PLA and the rest of the pieces in white PLA, all gifted to me by MatterHackers. While the white dots snap into place inside the top dome, I didn’t want to take any chances that one would pop out, so I used CA glue to permanently fix them in place.
These will be set on a bar top, so I devised a way to prevent the dome from rolling around after it’s removed from the base. I made a special version of the white dot that is flat instead of domed and strategically placed it on what will be the heaviest side. This way it sits nicely on the flat bar with the text oriented the right way.
The other important feature is the way the lid fits on the base. We want it to be tight enough that it doesn’t fall off while serving, but loose enough that it doesn’t lift up the base when the cap is lifted. It took a few iterations to get this tolerance just right. I also adjusted the thickness of the piece with the gills to increase the light transmission through a thinner layer of plastic.
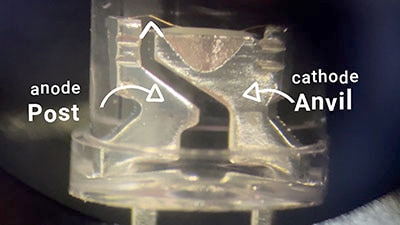
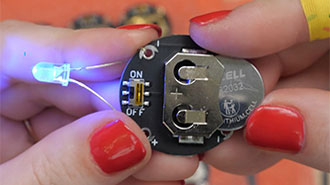
The circuit is super simple– it’s made with these color-changing LEDs, wired in parallel with each other and connected to one of my coin cell battery holders.
I have a tutorial on my YouTube channel that goes into more detail about simple LED circuits like this one, and I’ve also extensively covered the topic in my DigiKey YouTube series.
Technically, I should have added a resistor in series with each LED. But I was looking to make this circuit as simple and small as possible. My clapback to the haters is that the coin cell battery has a somewhat higher internal resistance than most other types of batteries. We learned this with LED throwies.
And technically, these color-changing LEDs have a chip inside that is exerting some kind of control over how much current each LED is getting at any given time. Anyway, regardless of the color, so long as the LEDs don’t burn out immediately upon powering up, the only danger is that they won’t last the many years they otherwise would. I’m not worried about that for this project, which is based around a limited-time menu.
To attach the circuit inside each mushroom cap, I held it against the shelf I added earlier, with the switch aligned to the hole, and used hot glue to affix the PCB to the PLA.
Tip: Here’s a tip for setting up your hot glue super quick– just hit it with a little canned air. It’s cold because it’s depressurizing as it leaves the can, and if you tilt the can horizontally or upside down, you get more of the propellant, which is even colder.
Then, after the hot glue was completely set, I went in with some trusty E6000 to be double sure it would stay put. Hot glue comes off easily when exposed to alcohol, after all, and there’s a greater than zero percent chance that a drink might get spilled on these things… You know, they’re for a bartender, after all. I should mention that these things aren’t touching any food or beverage, and the glues were allowed to dry for a few weeks, so there wouldn’t be any residual smell.
Here’s something I wish I knew earlier– E6000 is an awesome glue, and it’s best to get these small tubes rather than one big one. Each one is sealed individually, so you always get a fresh batch in the perfect quantity for most projects. This avoids the common pitfall where the opened tube starts to cure before you’ve had a chance to use it up, so next time you need it, you have none at all. We’ve all been there.
For the labels, I made a circle the same size as the interior cutout on the mushroom cap and centered the text inside using an Alice in Wonderland Font.
I printed the labels on regular printer paper and used a glue stick to affix them. This is a simple process, but I want to point out that if you don’t do a good job of cutting out the paper circle, its edge becomes very apparent due to the backlighting. So, it took me a few tries to get a nice result.
This collab was so fun. I love bringing some electronics magic into unexpected places. For myself to keep and to demonstrate to my students, I printed a few more mushrooms in other colors and experimented with different color LEDs, too.
Thanks for reading!